Car diagnostic tools information by obd2tool


Model: BMW X1

Year: 2010

Instrument type: 35080

Immobilizer: CAS3-0L15Y

Device: CGDI CG Pro 9S12 Key Programmer

Purpose: odometer correction

CG-PRO-Reset-Odometer-on-a-BMW-X1-CAS3-2010-M35080-1

CG-PRO-Reset-Odometer-on-a-BMW-X1-CAS3-2010-M35080-2

Original odometer: 191,245 km

Step 1: Remove Dash

Turn off ignition.  Remove and disassemble dashboard instrument

CG-PRO-Reset-Odometer-on-a-BMW-X1-CAS3-2010-M35080-3

CG-PRO-Reset-Odometer-on-a-BMW-X1-CAS3-2010-M35080-4

CG-PRO-Reset-Odometer-on-a-BMW-X1-CAS3-2010-M35080-5

CG-PRO-Reset-Odometer-on-a-BMW-X1-CAS3-2010-M35080-6

CG-PRO-Reset-Odometer-on-a-BMW-X1-CAS3-2010-M35080-7

Locate chip m35080DOWQ

CG-PRO-Reset-Odometer-on-a-BMW-X1-CAS3-2010-M35080-8

CG-PRO-Reset-Odometer-on-a-BMW-X1-CAS3-2010-M35080-9

Step 2: Remove IMMO Box

Remove immo box CAS3-0L15Y

CG-PRO-Reset-Odometer-on-a-BMW-X1-CAS3-2010-M35080-10

CG-PRO-Reset-Odometer-on-a-BMW-X1-CAS3-2010-M35080-12

CG-PRO-Reset-Odometer-on-a-BMW-X1-CAS3-2010-M35080-13 CG-PRO-Reset-Odometer-on-a-BMW-X1-CAS3-2010-M35080-14 CG-PRO-Reset-Odometer-on-a-BMW-X1-CAS3-2010-M35080-15

Step 3: Change mileage in dash

Open CGPro software

Solder 080DOWQ chip into CGPRO M35080/35160 adapter

CG-PRO-Reset-Odometer-on-a-BMW-X1-CAS3-2010-M35080-16

Select Model->Adjust mileage->BMW->35080 V1 (080DQ)

CG-PRO-Reset-Odometer-on-a-BMW-X1-CAS3-2010-M35080-17

Choose Adjust mileage function icon and enter mileage you desired

CG-PRO-Reset-Odometer-on-a-BMW-X1-CAS3-2010-M35080-17

Step 4: Correct odometer in Immobilizer

Connect CAS3 0L15Y eeprom IC chip with CG-Pro DB25 connector

CG-PRO-Reset-Odometer-on-a-BMW-X1-CAS3-2010-M35080-18

CG-PRO-Reset-Odometer-on-a-BMW-X1-CAS3-2010-M35080-19

In CG Pro software, select Chip->Adjust mileage->BMW->CAS3 0L15Y

Manully enter new mileage you desired

Press YES to confirm

CG-PRO-Reset-Odometer-on-a-BMW-X1-CAS3-2010-M35080-20

Both dash and immo mileage reset successfully. Reinstall dashboard and immo box to vehicle.

CG-PRO-Reset-Odometer-on-a-BMW-X1-CAS3-2010-M35080-21

Reset fault codes or do necessary coding with CGDI BMW.


What’s the difference among Autel full system diagnostic systems, MaxiCOM MK908P, Maxisys Elite, MS908P and MS908?

Autel-MaxiCOM-MK908P-vs-MaxiSys-Elite-vs-MS908P-vs-MS908

In conclusion:

The MK908P is an upgraded version of MS908P, and the difference between them is that MK908P is equipped with more advanced hardware.

*  Processor: The MK908P is processed by the powerful Samsung Exynos hexa-core Processor (1.3GHz Quad-core ARM Cortex-A7 + 1.7GHz Dual-core ARM Cortex-A15) while the MS908P is using the Samsung Exynos Quad-Core Processor 1.4GHz.

*  Operating System: Diagnostic scan tool MK908P features Android4.4.2, KitKat operating system that is upgraded from Android 4.0, Ice Cream Sandwich.

*  Memory: The MK908P is equipped with 2GB RAM & 64GB on-board Memory, but MS908P only has 32GB on-board memory.

*  Screen Size & Pixel: The Automotive diagnostic scanner MK908P features 101.1 inches LED screen with 1920*1200 resolutions that provides a better user experience than MS908P’s 9.7 inches screen with 1024*768 resolutions.

*  Camera: The camera of MK908P is designed to provide a more detailed images using 8.0 Megapixel, AF with Flashlight.

?Battery Capacity: For a tablet diagnostic tool that is equipped with built-in battery, the battery life greatly affects the integrity of the diagnosis and the user experience. Compared to the Autel Scanner MS908P, the MK908P extends the usage time by increasing battery capacity by 4000mAh.


This is for those maybe interested getting DTS 8 or Vediamo v5 working on 2003 Mercedes later.

My configuration:
X230 Lenovo
SD connect C4
No Xentry nor DAS (it seems better to not install this as it can created more probles in test phase)
Just InstallSDconnectToolkit 2.1.30 also have 2.1.14 but not installed (maybe should I use 2.1.14 ? )
and DTS Monaco 8.08.021
IP4 set to 172.29.127.100 255.255.255.0 dns 8.8.8.8

My actual settings:

W215-2003-K-line-diagnosis-DTS-Monaco-or-Vediamo-1
W215-2003-K-line-diagnosis-DTS-Monaco-or-Vediamo-2

Set up 2 computers for testing:

computer 1)  vediamo 4.02.02  on XP Xentry 09.2014
computer 2) DTS 8.08.21 on Windows 7 x32 clean NO Xentry, No Vediamo, with a custom 2.1.7.1 Toolkit and ToolkitApiDll_4.0.dll in sytem32

Vehicle: W215 2003 V12 Biturbo

W215-2003-K-line-diagnosis-DTS-Monaco-or-Vediamo-3

Problem:

I found several source with W215 folder and 1 works, but partially
On the picture you can see, once I apply filter, these are the only few that connect

W215-2003-K-line-diagnosis-DTS-Monaco-or-Vediamo-4

Only these ecus above turn green

other 20-30 not

Solution:

The solution in understanding that in 2003 year where there’s no any Vediamo and DTS8

Free solution is using DAS. It solves 99.99% tasks in this kind of vehicles.
Not free solution use other hardware and software.

W215-2003-K-line-diagnosis-DTS-Monaco-or-Vediamo-5
W215-2003-K-line-diagnosis-DTS-Monaco-or-Vediamo-6

From Vediamo manual:

CaesarGo: This firmware usually runs directly in the non-volatile memory of your CAESAR hardware, e.g., in Part A or Part Y. Supports older communication protocols as well, e.g., KWFB. The new UDS protocol is not supported.
TLSlave: This firmware runs on the computer used. The faster the computer, the quicker the different communication tasks can be completed (e.g., flash processes). Also allows the simultaneous opening of up to 50 CAN channels. This firmware supports newer” protocols as well, e.g., UDS.

Good to know: CBF files is not about K-Line. CBF file use also W212 for example. Try to use Vediamo 4 for K-Line ecus.

For newbies: if you are not good at DTS or Vediamo settings, you could get a disk that installed all Mercedes software (Xentry/DAS, DTS, Vediamo, EPC, WIS, etc) before delivery. Tested successfully and plug-and-play!

Look here:

W215-2003-K-line-diagnosis-DTS-Monaco-or-Vediamo-7

Chart: explains the reason why many are looking for DTS

W215-2003-K-line-diagnosis-DTS-Monaco-or-Vediamo-8


Solution to vxdiag Benz xentry error No access authorization, You must contact the User Help Desk.

vxdiag-Benz-xentry-no-access-authorization-1

Reason:

Means the License errors, need register again.

How to register Xentry?

If you use the hard disk in the package, you will find a TOOL folder on the desktop, click it and then 1 – StartKeyCenter”.

vxdiag-Benz-xentry-no-access-authorization-2

First open 1-StartKeyCenter” and 2-Key”, enter ID and date, finally press the rectangle button to gain registration code.

vxdiag-Benz-xentry-no-access-authorization-3

Copy and paste the registration code into the StartKey box, press Save” button.

vxdiag-Benz-xentry-no-access-authorization-4

Get message StartKey saved successfully.” means the registration succeed.

vxdiag-Benz-xentry-no-access-authorization-5

PS: The final step is to save the registration info, this step is important which can’t be neglected, just Run”3 -Save”.

vxdiag-Benz-xentry-no-access-authorization-6

The solution is applied to the popular V2018.12 Benz C6 OEM DOIP Xentry

As well as sdconnect C4


As we all know, Tire pressure has a significant impact on safety of the whole car, Many countries have mandated to install TPMS in cars to reduce traffic accidents. So, how much do you know about TPMS?

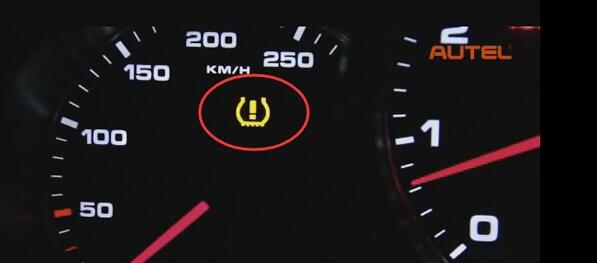
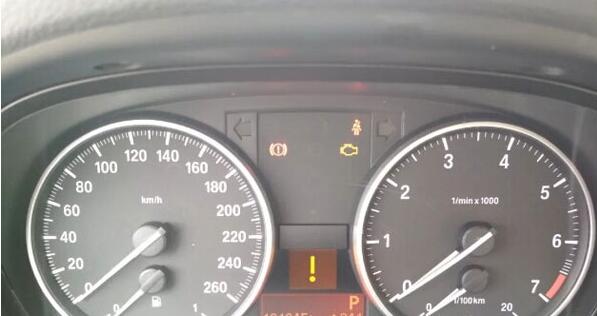
When the TPMS warning light is on, it may indicate low tire pressure or a broken sensor. And that could be the source of the accident.

In order to turn off TPMS light and solve the problem, you are recommanded to use Autel TS601 to scan all sensors to confirm if TPMS sensor is working or not.

Autel-MaxiTPMS-TS601-TPMS-MX-Sensors-1

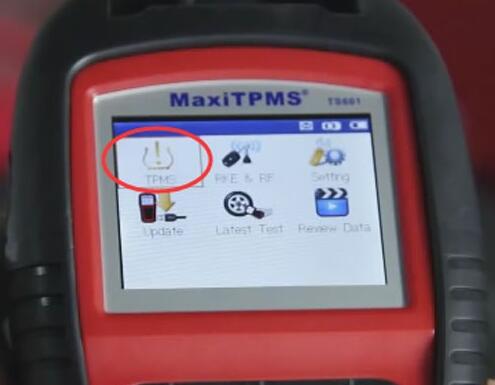
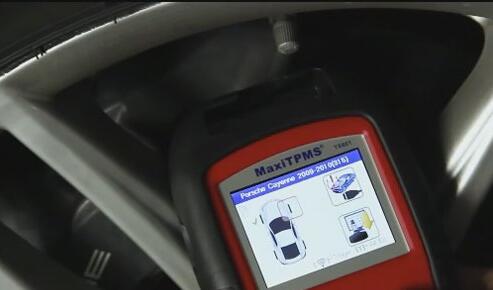
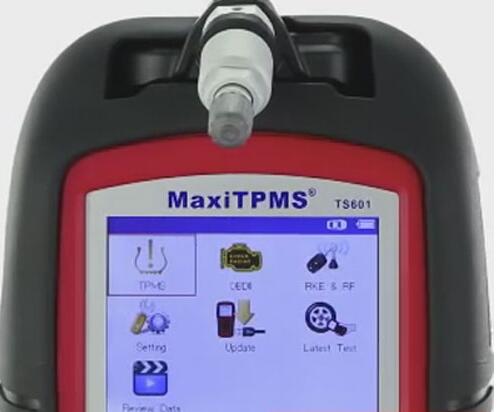
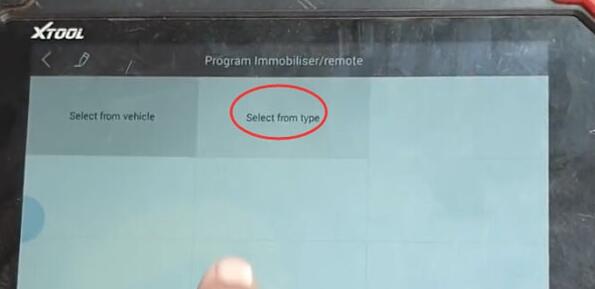
First, Power up TS601and choose TPMS” from the main menu.

Autel-MaxiTPMS-TS601-TPMS-MX-Sensors-2

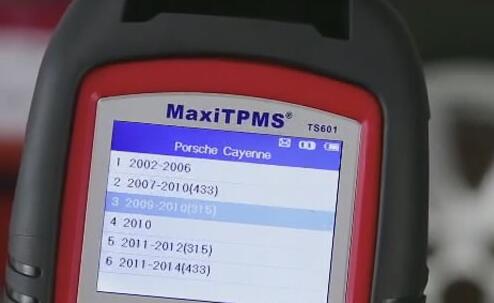
Select car make, model and year to enter the sensor activation screen

(Here we choose Porsche Cayenne 2010 as an example)

Autel-MaxiTPMS-TS601-TPMS-MX-Sensors-3

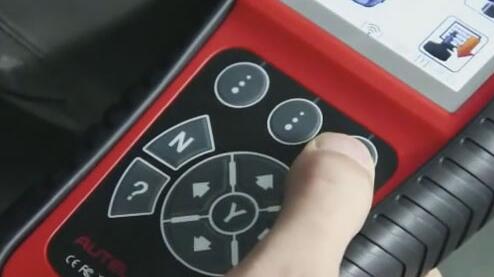
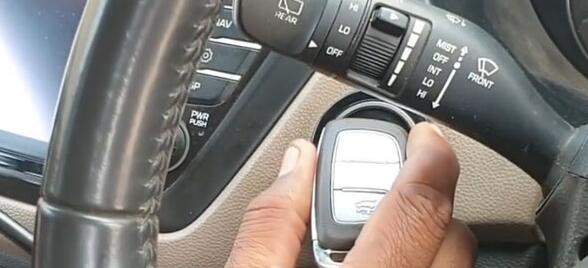
Take a walk around the car to each tire and point the tool at the valve stem

Autel-MaxiTPMS-TS601-TPMS-MX-Sensors-4

Then press trigger” button

Autel-MaxiTPMS-TS601-TPMS-MX-Sensors-5

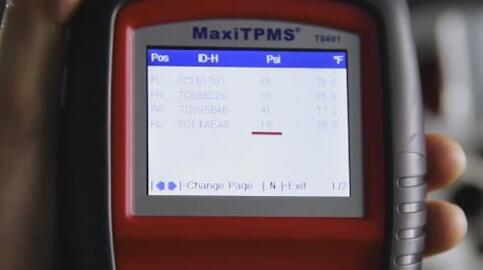
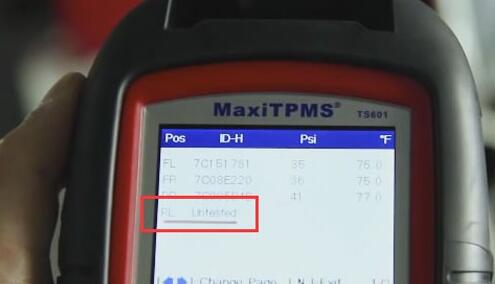
If the TPMS sensors are good and reading is successful, TS601 will display the sensors information onscreen.

Autel-MaxiTPMS-TS601-TPMS-MX-Sensors-6

In this case, the TPMS light is probably caused by low tire pressure, you should check the test result on TS601 to find out which low pressure tire and Inflate the tire solve the problem.
Autel-MaxiTPMS-TS601-TPMS-MX-Sensors-7

If the sensors is bad, TS601 can not read out the information, it will indicate that sensor is broken eigher mechanically or electronically.

Autel-MaxiTPMS-TS601-TPMS-MX-Sensors-8

Autel-MaxiTPMS-TS601-TPMS-MX-Sensors-9

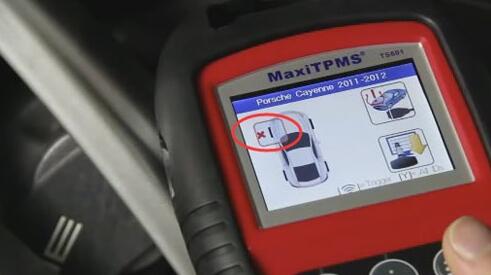
In this case, you need to replace original sensor with a new one and program the original sensor IDs or create a new generated ID to the new sensor.

How to Clone a set of TPM Sensors IDs?

Using TS601 Scan tool and 433MHz MX-Sensors.

Autel-MaxiTPMS-TS601-TPMS-MX-Sensors-10

Method1:

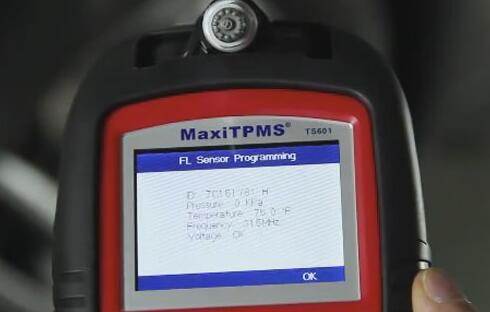
Use TS601 to activate the broken OE sensor and retrieve the sensor ID then you can program to the MX-Sensor.

Method2:

when the original sensor is not transmitting any more

Autel-MaxiTPMS-TS601-TPMS-MX-Sensors-11

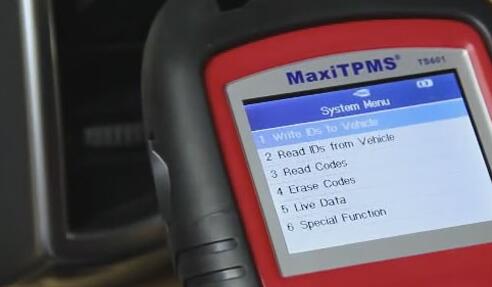
Connect the TS601 to your vehicle via OBDII cable and retrieve the sensor ID from the car system.

Choose Read IDs from Vehicle” on System Menu

Autel-MaxiTPMS-TS601-TPMS-MX-Sensors-12

Autel-MaxiTPMS-TS601-TPMS-MX-Sensors-13

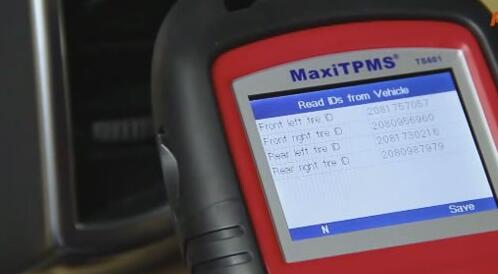
Insert the new MX-Sensor and program the copied ID

Autel-MaxiTPMS-TS601-TPMS-MX-Sensors-14

Method3:

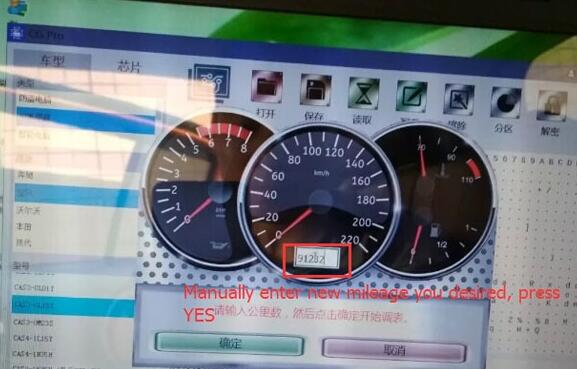
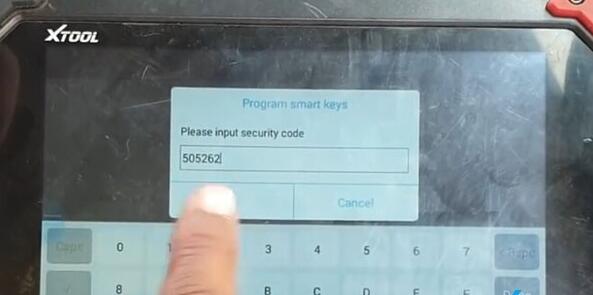
Manually input the original sensor ID to TS601

Autel-MaxiTPMS-TS601-TPMS-MX-Sensors-15

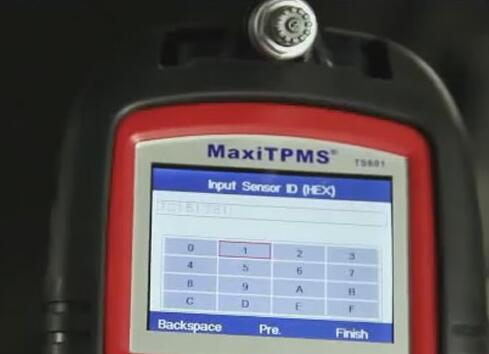
Then program it to MX-Sensor

Autel-MaxiTPMS-TS601-TPMS-MX-Sensors-16

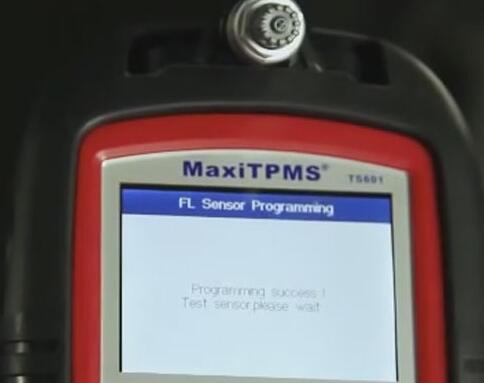
Since the new sensors are programmed with the same original sensor IDs, and installed to the same position, no TPMS relearn procedure is needed after replacement.

When the original TPMS sensor is electronically broken or missing, you can also useTS601 to create a new set of TPMS sensors with new IDs:

Choose TPMS” function on main menu

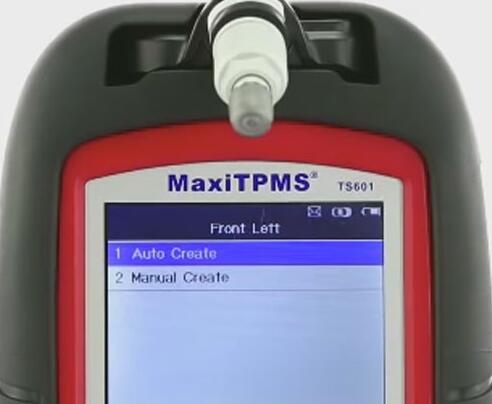
Select car make, model and year, insert the new MX-Sensors to TS601 slot

Choose Auto create”

Autel-MaxiTPMS-TS601-TPMS-MX-Sensors-17

Because it is new unique ID, you need to perform TPMS relearn so that it can recognize the new sensors.

That’s all steps to help solve all TPMS problem!


You will need a GM Tech 2 Scan Tool with it’s 32MB card (updated) and the CANdi module. I have seen the pair sell for as cheap as $224 on Obd2tool.com and as much as $3000 off eBay.

Btw, if you look for a decent tool for use only, it’s ok to have a cheap but functional china clone.

Seems like the old answers are a cheaper and easier solution.
1. Have a GM dealer do it
2. Have a locksmith do it
3. Buy the Dorman part that comes with a programming module for less than $80.

Those options are cheaper if you do not have a Tech 2. This is why you will expect to pay for a Tech 2.

Which is like saying it is cheaper to take my car to the shop and have them change the water pump for $100 instead of me going to sears and spending $250 on a cool set of craftsman tools and a toolbox and doing the work myself. Personally, I am heading to Sears, because those tools will keep on saving me money for the rest of my life.

Yes, the Tech 2 does other things besides programming a key fob and you really would have to be a chevy buff / mechanic before it would be worth buying one. The tech 2 is not for everyone.

The Tech 2 is a powerful, versatile hand-held diagnostic computer, designed to help diagnose and repair automotive electronic systems.The Tech 2 supports the changes in the on-board electronic systems for model years 1992 to 2013. With the addition of the CAN Diagnostic Interface (CANdi) module, Tech 2 will support GM on-board electronic systems thru 2013.

The CANdi is an in-cable module that works with existing Tech 2 components including the VCI, cables and adapters to add CAN diagnostic capability to the Tech 2 tester. The CANdi module is fully backward compatible with current Tech 2 functionality and operates transparently when diagnosing non-CAN-equipped vehicles.

The Tech 2 has since been replaced with GM MDI

VCDS 18.9.0 updated, VAG-COM VCDS 18.9.0 version includes support for new 2019 model cars,as well as a number of other enhancements and improvements. VCDS 18.9 can update online directly for who have VCDS 18.2.1 VAG-COM Cable. VCDS 18.9.0 release works with VAG-COM from Obd2tool.com & all genuine Ross-Tech interfaces made since 2004, but support for 2019 model cars requires a current register interface.

VAG-COM-V18.9-VCDS-18.9-2 VAG-COM-V18.9-VCDS-18.9-3

VCDS 18.9 Software Overview:
Software Version: VCDS 18.9
Release VCDS 18.9 operating system: works with Windows 7, 8, and 10 (both 32-bit and 64-bit)
Earlier versions of Windows such as 2000, XP, and Vista might still work, but we no longer consider them supported.
VCDS does not work on Windows 10 S”, which does not allow software to be installed from any source other than the Microsoft Store. If wish to use VCDS on a computer with this Student” version of Windows, you’ll need to upgrade it to Windows 10 Pro.
Windows running in a VM (Parallels, Virtual Box, etc) may work but is not supported.
Windows 95, 98, ME, and NT4 definitely will not work.
VCDS Release 18.9 compatible hardware: must be used with a licensed Ross-Tech interface.
That include all genuine HEX-, KEY-, KII-, or Micro-CAN series Interface of interfaces.
It does not work with any third-party interfaces or some of the older low-tech” interfaces we made and sold before 2004.

Need VCDS 18.9.0 VAG-COM VCDS 18.9 Ross-Tech Register Interface Ross-Tech VCDS genuine interface just contact us freely.


This article show a test case on how to use OBDSTAR X300 DP PLUS to correct odometer for Maserati Ghibli 2014.

OBDSTAR-X300-DP-Plus-Correct-Odometer-1

And for more X300 DP Plus test please check here:OBDSTAR X300 Plus test cases,for more odometer correction check: Mileage Correction Cases

Procedures:

Connect OBDSTAR X300 DP Plus Programmer to vehicle via OBD,select Diag Program”

Select Cluster Calibrate”

Select MASERATI”

OBDSTAR-X300-DP-Plus-Correct-Odometer-2

MASERATI V30.00

OBDSTAR-X300-DP-Plus-Correct-Odometer-3

GHIBLI

OBDSTAR-X300-DP-Plus-Correct-Odometer-4

GHIBLI 95160

OBDSTAR-X300-DP-Plus-Correct-Odometer-5

Mileage Calibrate

OBDSTAR-X300-DP-Plus-Correct-Odometer-6
This function is available by connecting the server,please ensure the internet connection is normal.

Then input the name of file to save,here input MSLD0000” and tab Enter” to continue

OBDSTAR-X300-DP-Plus-Correct-Odometer-7

The current mileage of 4001km(error does not exceed 20KM)? Press ENTER to continue,Press ESC to exit.

OBDSTAR-X300-DP-Plus-Correct-Odometer-8

Now input the mileage value you want,here input 39915”,then tab Done”

OBDSTAR-X300-DP-Plus-Correct-Odometer-9

Then OBDSTAR X300 PAD2 Plus will prompt you calibration complete”

OBDSTAR-X300-DP-Plus-Correct-Odometer-10

Check the mileage value 39880”

OBDSTAR-X300-DP-Plus-Correct-Odometer-11

Done!


Question: I am able to use Ford VCM II to read and clear any dtcs etc so it is recognizing vehicle, just freezing up when opting parameters ? I am working on Ford 2014 custom.

I have vcm2 clone.

Solution-to-Ford-VCM2-freezing-up-when-opting-parameters

I’ve had similar before but was on my faulty vcm i think. Freezing is usually because of something which can’t communicate quick enough and ends up timing out.

You could reset the vcm via the red reset button, it’ll force ids to reload the firmware to the vcm which will be whatever firmware you have in the ids that is loaded, v101 I think you said.

You do have the vcm2 clone yes.

Remove the rubber end boot to reveal the button then have that pressed and held then plug usb lead into laptop and wait for beep then let go of the button, ids should prompt you to load the firmware so agree.

Next if the problem persists you need to look at reloading the laptop.

It is possible that the vcm is going though does it show the red padlock and red vcm icon on the task bar or does the lock disappear? Does the vcm show computer light flashing? Do you hear bing bong like it is missing connection?

Can you do a fresh install of w7 and v86 with license? That is the best ids for euro 4 transits if that is what you are working on?

Right it’s not as simple as running native v86 then which was going to be my suggestion.

I have v96 running and it works on my 65 custom.

I don’t want to write your vcm off but the only things you can do is.
Change cables.
Reset vcm.
Change software on laptop.
Change laptop completely.
There maybe vcm diagnostics available in ids but as it is a clone vcm i wouldn’t trust it.


If you’re looking for nothing less than the best OBD2 scanner on the market, then look no further than the Autel Maxisys elite scan tool. Autel Scanner is well known for their quality scanner. And the Autel Maxisys is well-known for its speed, multi-tasking, and simplicity. The Autel MS908CV scanner has the same features, but less processor power(means a little bit slow). It is the Upgraded Version of Autel Maxisys MS908P Pro. For the many years that I have repaired and maintained different car models and makes in my car repair shop, this has been one of the most reliable scanners that I have used over the years. Read this Autel Maxisys Elite review to know more about this advanced diagnostic tool.
Who will buy the Autel Maxisys Elite Diagnostic Tool?

The Autel Maxisys elite diagnostic scanner is the perfect scanner for busy and professional mechanics as well as technicians. Let the price not deter you from acquiring this fast, efficient, and comprehensive diagnostic scan tool. You can also use it on a variety of car brands, and its ergonomic design is fun to have in the hands. The Wi-Fi connection makes updating easy and the large LCD displays make reading and erasing codes to be quick.
Technical Specifications of the Autel Maxisys Elite Scanner
Features

Autel Maxisys Elite
Works:     All 1996 and newer vehicles
OS:     Android 4.4.4 KitKat
Display:     9.7” Retina display with 2048X1536 resolution & Capacitive touch screen
Processor:     NVIDIA Tegra? 4 (4-PLUS-1 Quad-core Processor) 1.8GHz with ARM Cortex – A15 CPU
Memory:     2GB RAM & 32GB Embedded Memory
Camera:     Rear: 8.0 Megapixel, Autofocus with Flashlight
Front: 2.0 Megapixel
Sensors:     Ambient Light Sensor, G-sensor
Connectivity:     802.11a/b/g/n/ac WIFI
Version 2.1 3Mbs Bluetooth
RJ45 Ethernet Connection
3.0 USB (2.0 Compatible)
HDMI 1.4a
SD Card (Support up to 32GB)
Audio Input/Output:     Microphone
Dual Speakers
3-Band 3.5 mm stereo/standard headset jack
Input Voltage:     DC/12V/3A
Power and Battery:     3.7V/13600mAH Lithium-polymer battery
DC/12V/3A Power Supply
Power Consumption:     Max 20W
Storage Temperature:     -20 to +70C
Operating Temperature:     -10 to +55C
Models:     More than 80 US domestic, Asian and European
WiFi, Bluetooth:     Yes
Protocols:     Most OBD1/OBD2
Check Engine Light(MIL):     Yes
Reads, stores Data:     Yes
Clears codes & resets monitors:     Yes
Playbacks live sensor data:     Yes
Views freeze frame data:     Yes
Remote Control Tech Support:     Yes
Real-Time push message notifications:     Yes
Get transmission codes:     Yes
Software Update:     1 year free update
Warranty:     One year warranty


How-to: generate and program Hyundai i20 smart key with VVDI Mini Key Tool and XTOOL X100 PAD2.

Step 1: Generate remote with VVDI Mini Key Tool

Insert Xhorse universal smart key into detection coil

hyundai-i20-xtool-x100-pad2-1 hyundai-i20-xtool-x100-pad2-2

hyundai-i20-xtool-x100-pad2-3 hyundai-i20-xtool-x100-pad2-4

Select Vehicle Remote->Hyundai->Elite i20 C7000 ID46 433 15+ 3BTn 2432

Press Generate
hyundai-i20-xtool-x100-pad2-5

Generating remote in progress
hyundai-i20-xtool-x100-pad2-6

Generate remote succeed

Step 2: Program smart key with xtool x100 pad2

Connect X100 pad 2 with vehicle via OBD socket

Select Hyundai->Security Code->47 Authorization code (smart card)

hyundai-i20-xtool-x100-pad2-7

hyundai-i20-xtool-x100-pad2-8

Enable network connection before reading security code

Turn on ignition switch

hyundai-i20-xtool-x100-pad2-9

Read security code success

Select Program Immobilizer/remote->Smart key system->China-> Type 5 (without card slot)

hyundai-i20-xtool-x100-pad2-10

hyundai-i20-xtool-x100-pad2-11

hyundai-i20-xtool-x100-pad2-12

hyundai-i20-xtool-x100-pad2-13

Press Start button to continue

hyundai-i20-xtool-x100-pad2-14

Select Program smart keys

hyundai-i20-xtool-x100-pad2-15

Xtool X100 pad 2 will ask to enter security code to access

hyundai-i20-xtool-x100-pad2-16

Put the original key close to the Start button

hyundai-i20-xtool-x100-pad2-17

Program success. Press YES to program next key

hyundai-i20-xtool-x100-pad2-18 hyundai-i20-xtool-x100-pad2-19

Put the smart key to be programmed close to the Start button

hyundai-i20-xtool-x100-pad2-20

Program smart key success

hyundai-i20-xtool-x100-pad2-21

hyundai-i20-xtool-x100-pad2-22

Test remote control and start car.

Done.


Free download Ksuite latest version 3.37 software for KTAG or KESS V2 master clone ecu programmer:

KSuite3_37_tuningbot.com_setup .exe

KSuite3_37_tuningbot.com_setup .exe (47.1 MB)

https://mega.nz/#!RptwgQ7a!2dgPfzODA5e8cbtFVfn_7VHs_AaMmZ03-Tmb6n0Qfeg

Changelog: K-Suite version 3

K-SUITE 3.38 – K-TAG TRICORE SERVICE MODE TC1762 TC 1766 TC1782
K-SUITE 3.37 – K-TAG TRICORE SERVICE MODE TC1793
K-SUITE 3.36 – K-TAG TRICORE SERVICE MODE TC1767
K-SUITE 3.35 – KESS JEEP EDC17CP27 via OBD
K-SUITE 3.34 – KESS BMW G-SERIES MD1CP002 and MD1CS001 via OBD
K-SUITE 3.33 – K-TAG TRICORE SERVICE MODE TC1724
K-SUITE 3.32 – K-TAG MITSUBISHI , DENSO , KEIHIN, DELPHI, SID94
K-SUITE 3.31 – K-TAG TRICORE SERVICE MODE TC1797
K-SUITE 3.30 – MERCEDES EDC17CP46 via OBD
K-SUITE 3.29 – BMW MEVD17.2 , MEVD17.2.4, MEVD17.2.9 via OBD
K-SUITE 3.28 – MERCEDES edc17cp57 edc17c66 via OBD
K-SUITE 3.27 – NISSAN SH7055 and SH7058 via OBD
K-SUITE 3.26 – FIAT – JEEP  – MASERATI – LANCIA edc17c49 – edc17c79 via OBD
K-SUITE 3.25 – HONDA ACURA Keihin sh7058 and Continental mpc5554 via OBD
K-SUITE 3.24 – NISSAN INFINITI MEC100, MEC7x e DEA030 Hitachi ecu via OBD
K-SUITE 3.23 – BMW edc17 E series via OBD
K-SUITE 3.22 – CVN on VAG
K-SUITE 3.12 – DCM6.1
K-SUITE 3.20 – Bosch MG7.9.8  MEVD17.4.4 Motorola CM876
K-SUITE 3.19 – Toyota and Lexux OBD
K-SUITE 3.18 – Honda Civic Med17.9.3
K-SUITE 3.17 – Toyota Hilux Denso
K-SUITE 3.16 – SIM2K-240 Delphi DCM3.7
K-SUITE 3.15 – VAG BOSCH EDC17CP74 VIA OBD!
K-SUITE 3.14 – DSG MQB VAG TCU REMAPPING WITH KESSV2!
K-SUITE 3.13– DODGE RAM 1500 5.7 FROM TODAY IN OBD!
K-SUITE 3.12: BMW MOTORRAD BOSCH ME17.2 BMS-X IN OBD
K-SUITE 3.11: NISSAN LEAF!
K-SUITE 3.10: VOLVO DENSO VIA OBD!

Or you can use the old but functional version Ksuite v2.47

kess-v2-ksuite-2.47-download

Installing a higher version of Ksuite does not bring new protocols but adds ECUs to existing protocols and a lot of bug fixes and checksums fixes, Simos18 4.5MB…
This is not useless and the grayed out protocols are not really a problem.

And Ksuite 2.47 is even better with Kess firmware v2 5.028.   Work with simos18 very good.

If you don’t have a good Kess fw 5.028, firmware 5.017  is the best online option for you. it’s tested by real pros.

kess-v2-ksuite-2
kess-v2-ksuite-3

Compared with the older version 2.33, Ksuite 2.47 adds

New protocols:

CATERPILLAR A5E2 P 549
VOLVO 1.6 /2.0 CONTINENTAL SID807 P 489
FORD TRUCK FPT ENGINE BOSCH EDC7UC31 KLINE P 548
HUSQVARNA KEIHIN CAN P 554
ALL SIMOS 18 18.1 18.2 NEW GENERATION 4.5MB
AND MANY NEW VERSIONS 2017 ON SAME PROTOCOLS
MUCH CHECKSUMS BUG FIXED

7400 new vehicles:

kess-v2-ksuite-2.47-vehicle-list-new-1 kess-v2-ksuite-2.47-vehicle-list-new-2 kess-v2-ksuite-2.47-vehicle-list-new-3 kess-v2-ksuite-2.47-vehicle-list-new-4 kess-v2-ksuite-2.47-vehicle-list-new-5
kess-v2-ksuite-2.47-vehicle-list-new-6 kess-v2-ksuite-2.47-vehicle-list-new-8 kess-v2-ksuite-2.47-vehicle-list-new-9 kess-v2-ksuite-2.47-vehicle-list-new-10 kess-v2-ksuite-2.47-vehicle-list-new-11

Enjoy!


KTAG V7.020 sw 2.25 is verified working great, it has an improved onscreen message management, it can read the gearbox sensor on Magneti Marelli 8GMK ECUs. The following paragraphs will offer Ktag 2.25 download free link on mega, carlist, installation and feedback.

Ktag 2.25 free download on mega

https://mega.nz/#!REpxwY5D!8FIo0maWqHbmEvHnTskmDVb68YLcZQQyoda5NHrapms

Works on XP, WIN7 (Try on WIN8 WIN10 at your own lucky)
Works on almost all Kess master
***But SE135 has a different driver, so their installation method is a little different.

Ktag 2.25 car list:
https://share.weiyun.com/57X8G6n  Password: 46ip19

1.How to update Ksuite 2.25 from 2.23 and read/write ECU data (SE135)?
Steps on how to update Ksuite 2.25 from 2.23:
Open Ksuite_ 223_V2” to setup the wizard according to the prompt.
ktm100-2-25-install-01
ktm100-2-25-install-02
Get message Connection not established”.
ktm100-2-25-install-03
Right click on Ksuite” on the desktop, choose Properties”, select all files and delete them.
ktm100-2-25-install-04
Open the folder Ksuite 2.25”, copy all files except Help”, paste them to Kusite 2.23 folder to replace the same files.
Copy the Help” folder from ” Kusite 2.23″ to ” Kusite 2.25″
ktm100-2-25-install-05
Plug KTM100 FW V7.020 into the computer, install the driver if the computer is XP.
Check if the driver is installed well.
ktm100-2-25-install-06 ktm100-2-25-install-07 ktm100-2-25-install-08 ktm100-2-25-install-09
Open Ksuite to read and write ECU data.
ktm100-2-25-install-10
2.How to update Ksuite 2.25 from 2.23 and read/write ECU data like Mercedes Bosch ME9.7.
Steps on how to update Ksuite 2.25 from 2.23:
Decompress Kess -223-safe”, just follow the onscreen message to complete Ktag Ksuite 2.23 setup.
how-to-update-Ksuite-1
how-to-update-Ksuite-2
Right click on the icon K-suite 2.23”, select Properties” , click on Target”, select from the res” to the release”, delete them.
how-to-update-Ksuite-3
Back to open Ksuite 2.25”, copy all files except Help”.
Then paste them to Ksuite 2.23”.
how-to-update-Ksuite-4
how-to-update-Ksuite-5
Decompress Help Kess-ktag.zip” in Ksuite 2.25 folder.
Select all Help_ESN.ZIP”, and paste them to Ksuite 2.23 Help folder.
how-to-update-Ksuite-6 how-to-update-Ksuite-7

Ksuite 2.23 is successfully update to Ksuite 2.25.
Rename the K-Suite 2.23” as K-suite 2.25”.
Plug Ktag 7.020 into the computer.
Please Note: before opening K-suite 2.25, you need to check if the driver is installed well by checking the device manager, there is a Dataloader” under Universal Serial Bus Controllers”.
Now open Ktag 2.25 to read and write ECU data.
how-to-update-Ksuite-8
how-to-update-Ksuite-9
Ktag 2.25 is multi-language available.
how-to-update-Ksuite-10
Read & write for example Mercedes Bosch ME9.7.
how-to-update-Ksuite-11 how-to-update-Ksuite-12 how-to-update-Ksuite-13

Question:2014 Toyota Corolla – Odometer Correction Tool X300M fail Display says Does not support
I tried reading with all the Toyota but all said the same thing
Yesterday I tried on a 2013 Toyota Camry it read the mileage but was not correct

Reply:

2013 Toyota Camry, cluster calibration, doesn’t support at present.

Fact:

Actual Toyota Corolla clusters there are two options from different manufacturers.
Those released by VDO Siemens can be adjusted by OBDII.
And those that are released Denso, you must disassemble.

None of the instrument clusters, which was released by Denso, cannot be corrected by OBDII.

All instrument clusters that are installed on the all Camry model, are issued by OBDSTAR X300M.

So don’t wait for the cable solution. It’s impossible.

Only the new XV70 series is equipped with a Denso or VDO clusters.

You can only adjust some panels, without disassembling the instrument cluster, connecting to the Denso control points.

But the Obdstar company does not release such a tool and will never release it.

OBDSTAR-X300M


If you are looking for a car diagnostic tool, you could think of Tech 2 Scanner. This post will offer more information about it.

Tech2 scan tool Features

1) Authentic GM software in the Tech 2 Flash means the most comprehensive diagnostic software available for late model GM vehicles.
2) Support for on-board diagnostics on all GM systems 1992 thru 2011.
3) Removable hardware modules provide insurance against scan tool obsolescence.
4) Large, easy-to-read backlit screen.
5) RS232 & RS485 ports provide the avenue to connect future devices to your OBD2 Scanner Tech 2 Flash.
6) Ability to capture stored DTCs, Freeze Frame, and Failure Record for later review.
7) Ability to view the status of vehicle diagnostic tests as they run.
8) Bi-directional The authentic GM 1992-current year software will provide full bi-directional control when performing power train, chassis, and body diagnostics.

Tech2 Specification:

1) Dimensions: 12
2) Microprocessor: 32 bit,16 MHz
3) Memory: 32 MB flash type II PCMCIA. Type III slot available for future expansion.
4) Communications: Integral RS232 communication port.
5) Screen: 3.8.8 backlit monochrome with full graphics capability: 320,40 pixels. Displays up to 9 vehicle parameters at once. Download Tech2 Brochure (5.2 Mb)

GM Tech2 Package List:

Tech-2 Flash Tester
32 MB PCMCIA Card with GM OE Applications
CAN diagnostic interface module(Candi) and instruction sheet download (199.2 kb)
RS232 cable and user manual
RS232-DB9 adapter
DLC Cable, DLC Loopback Adapter
12V Cigarette Lighter Power Cable
SAE 16/19 Adapter
NAO 12/19 Adapter
Battery Power Cable
Storage Case
TIS 2000 CD

gm-tech2


تبلیغات

محل تبلیغات شما
محل تبلیغات شما محل تبلیغات شما

آخرین وبلاگ ها

آخرین جستجو ها

گالری نجوا مرجع انتشار رپورتاژ‌ آگهی Karissa تحلیل گفتمان حقوقی Chad سامانه دانش آموزی سناد و کارکرد های آن Holly Toupee | Wigs | Hair Extension | Hairpiece Canada سوالات آزمون استخدامی سازمان مالیاتی کشور